How to install an Amplifier:
Soldering Equipment
1.) Disconnect the battery terminals: Just be safe. Do this.
Soldering Equipment
2.) Run the power cable from the battery to the location of the amp or distribution block. (To read more about running wires, click here)
If you run it through any sort of sheet metal, be sure to protect the power cable with a rubber grommet, or some other protective device.
Be sure you have plenty of slack at both ends of the cable. This will make your life easier, trust me!
Be sure you run the power cable away from any RCA cables. I usually run the power cable down the side of the vehicle that the battery is installed on, and run the RCA cables down the center of the vehicle.
Once the cable has been run and secured, leave it alone for the time being. Don't hook it up, cut it or do anything else with it!
Be sure the power cable is secured with wire ties or some other means, BUT! Not until you have run the cable, and determined that the cable is going to work out where it is located.
3.) Find a suitable ground point close to the amplifier
This point should attach to the vehicle's chassis, and be a solid connection.
Run your ground cable from the amp (or distro block).
Just like with the power cable, this wire should be secured and protected. It should not be installed in a location that will distress it.
Use a piece of sandpaper to remove any paint or finish from your ground point. Use it to also sand away any rust or residue on your ground point. You want a good solid connection, so you'll want to see nice shiny metal.
Prepare an appropriately sized ring terminal
If your ground cable is going to be attached with a ring terminal (the most recommended means), attach it now. Remember! Do a good job here. We're looking for a strong, solid electrical connection. If you can use solder, I would recommend it!
Use a washer when attaching your ring terminal to your vehicle's chassis.
Finally, cover the ground point with something non-conductive. Also, Find some spray paint or finish that will protect your ground point from rust.
4.) Be sure to run RCA cables and the remote turn on!
Pull your head unit out of its mounting location.
If it's not already hooked up, hook up your remote turn-on wire to the head unit's wiring harness.
Determine which RCA cables will go to each channel on your amp(s). I find it useful to have a 4-channel cable and an additional 2-channel cable for your subwoofers. This makes it easier to run all of the wires at once.
Run your RCAs and remote turn-on. Keep the RCA cables away from any sort of power cable, especially the power cable for your amp(s). It's OK to run the remote turn-on wire with the RCAs.
Make sure all cables are secured and not installed in a way that will distress them. Be sure they aren't pinched, scraped or kinked during any sort of driving activity. In any places where they'll need protection, be sure to cover them with a tough material.
5.) Run all of your speaker wires.
Now it's time to run more wires! Run speaker wires from your speakers to your amp's installation location.
Just like with all of the different wires above, be sure they are secured and protected.
6.) Hook up all of the wires at the amplifier!
Hook up the RCAs, speaker cables, remote turn on, power then ground.
7.) Hook up a fuse holder near the battery.
Be sure you have this piece of equipment (and a fuse) before you even attempt to hook your amp up to your vehicle's electrical system. Seriously!
The fuse holder MUST be within 18" of the battery.
Be sure the fuse holder is connected solidly to the power wire.
Be sure you have the right sized fuse!
Be sure the fuse holder is mounted in a safe place, and the power wires are all secured away from any moving parts.
8.) Hook up any special battery terminals
If you have any fancy-schmancy battery terminals, now is the time to be sure they're connected properly. Be sure they are secure and protected. Hook up any other of your vehicle's cables to the battery. If you can get covers for your new battery terminals, I would recommend them.
9.) Reconnect the battery.
Put your shiny new terminals on those battery posts!
10.) Test!
Before turning your system on, turn the amplifier gains all the way down. Turn on your system and listen. Does everything work? How much noise do you hear? Is there audible distortion (If so, don't listen for long!) If everything's square, move on to the next step!
11.) Permanately Mount your amplifier
I hope that before you have gone through the previous nine steps, you have thought about how your amp fits into your system, and how you plan to install it. If not, I BEG OF YOU to think about this first. Figure out where you want your amp, how you'll get power to it, and what (if any) components will be installed near it. Also, don't be a fool! Be sure you've budgeted so you can actually afford everything you need for your amp to be installed FLAWLESSLY. Taking just a small amount of time to think about this stuff will pay off for a smooth install, and great sound. If you don't plan, you will screw it up.
When you mount your amp, you'll want to be sure you are protecting it from any sort of physical damage and heat. Car amps are tough, but you need to be sure that you are installing it in a way that protects your amp from these hazards.
Soooooo, to protect your amp from physical damage (because they are usually installed in places where they are prone to damage such as in the trunk or under the seats), it is best to build some sort of enclosure for it. This enclosure should be big enough to contain the amp (and possibly some fans), as well as the appropriate wiring. You will also want to be able to easily access the controls. If you really like to tweak your system, you might want to make your amp rack easily removable, but also keep theft in mind. Be creative on how to protect it. The truth is, you can get really fancy here, or just do something quick. Both will work.
Another thing to keep in mind when building an enclosure for an amp or mounting the amp in a place that is hot or has poor airflow is that the amp will get HOT. Heat damages electronics, so you should figure out a way to keep your amp cool and happy. Use fans, or even redirect the air conditioner!
One last thing about amps: I have found that if your amp is mounted to metal, it is sometimes prone to noise. I recommend mounting your amp to a piece of wood before installing it. This will prevent any sort or weird ground loop effects that introduce noise to your music.
12.) Tweak!
Now that you've installed your amp(s), you're pretty excited to get rollin. Step 1: Be sure all of the amp's gains are down, the bass boost is off, and the crossovers are set to the correct frequency band.
Get one of your favorite CDs, preferably one that is clean sounding. I have found classical and jazz to work great, but alternative and pop work as well. Try to avoid really loud or bass heavy music. If you must, try to use a more melodic CD: Not one that's just all bass, or noise, you know? The important thing is that the CD is representative of what you normally listen to, because it's YOUR system, and it's YOUR music. Darn tootin!
Step 2: Power on!
Step 3: Turn your head units controls to neutral. EQs off, loudness off, fade and balance centered.
Step 4: Turn the volume up until you hear distortion (you know it when you hear it, and go on to step 5), or the volume control is all the way up. (go to step 6)
Step 5: If you hear distortion, back the volume up until no more distortion is heard. At this point, you know how loud your system is gonna go before it starts distorting, sounding horrible, and smoking speakers. (Move on to step 7, and lower your volume!)
Step 6: If your head unit goes all the way up, and doesn't distort, you have a good unit that your amp can handle. Go to your amp, and while the music is playing, slowly turn up the gains. Once you hear distortion, back off a little. Turn your head unit's volume down!
Step 7: Now go to your head unit. Set all of the eq, loudness, crossover controls, and dsp that you want. Repeat steps 4-6 with all of these controls set to how you want them.
Step 8: Set all of your amp's bass boost or other controls to how you want them. Repeat steps 4-6 again.
Step 9: Once everything sounds good, you're ready to put a cover on your amp enclosure, and be sure your fans are hooked up properly. Put it away and forget it!
Step 10: You're in business! Have fun, and don't wake up your neighbors!
How to Install an Amp
Soldering Equipment
Dec 21, 2011 22:14:52
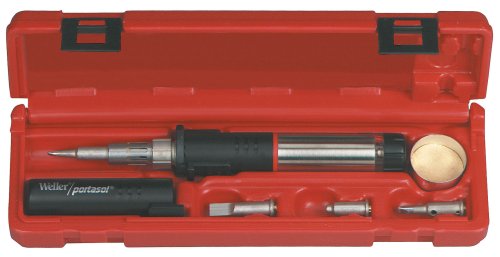
Click for larger image and other views
 >> Click here to update Christmas prices for Weller PSI100K Super-Pro Self-Igniting Cordless Butane Soldering Iron Kit <<
Christmas Sales Weller PSI100K Super-Pro Self-Igniting Cordless Butane Soldering Iron Kit Feature
- Operates up to 2 hours per refill of standard butane fuel.
- Kit contains PSI100 iron, sponge, stand and extra tips-Packed in a plastic case.
- Features Auto Switch safety shut off
- Butane fuel level is visible through a window on the body of the tool
- Built in butane filter
Christmas Sales Weller PSI100K Super-Pro Self-Igniting Cordless Butane Soldering Iron Kit Overview
Super Pro Portasol Kit- The patented soldering tool has a catalytic converter that provides a powerful, yet safe, flameless combustion. Easily interchangeable screw-in tips and accessories. Safety cut-off switch when cap is replaced. Refills with standard butane lighter fuel. Fast, flint-sparked ignition in high-strength plastic cap. (Butane Not Supplied). (Malaysia)
SAVE NOW on Christmas Sales Offers below!
Available In Stock. |
| This Christmas Weller PSI100K Super-Pro Self-Igniting Cordless Butane Soldering Iron Kit is cheap and shipping as well. |
|

Limited Offer Today!! Weller PSI100K Super-Pro Self-Igniting Cordless Butane Soldering Iron Kit Christmas and Cyber Monday 2011 Deals
Syntha 6 Protein Pnuematic Body Saw